Showing posts with label Holiday Gift Ideas. Show all posts

Monday, February 2, 2009

Valentine's Treats

We're back with a few more ideas for presenting sweets to your sweeties this holiday . . .

Now, what would Valentine's Day be without the chocolates?

Yes, you can give the little Conversation Hearts or decorate cupcakes, but chocolate is always best. To give, but especially to receive!

So, today let's dress up those plain chocolate bars . . .

These are a few examples we found while we were blogging out and about:


And here are the ones we've created here at The Shoppe . . .
These are the giant~sized Hershey Bars . . . the ones every scrapper secretly wishes for!


This 1st one was covered in solid cardstock with chocolate & pink paper from Basic Grey's Sultry line. We added a dove chipbird & stamped a tag with some fuzzy fibres.


The next one is made using BoBunny's Sweetie Pie papers, an embossed heart, Prima flowers, and a monogram using Cricut's Storybook Cart, all mounted on a chipboard scallopped circle.

This one would be perfect for a teacher. Or your best friend!


And last, but not least, are good ol' M&M's in an empty flower jar.
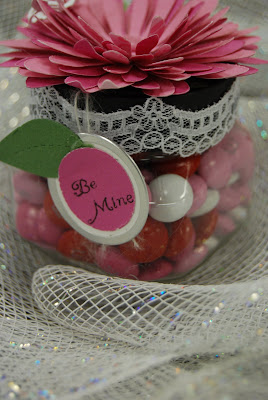

We've added lace around the rim and topped it off with layers & layers of die-cut flowers. Add a metal rimmed tag with a cute butterfly from Cricut perched on top!


Super-Simple projects, once again.
We hope that we've inspired you to make this Valentine's Day a little more special.

Thanks for stopping by . . .TaTa till next time

Thursday, January 22, 2009

Another Valentine's Project

Yesterday we sent out a newsletter from The Shoppe highlighting some of the newest Valentine's products that arrived.

We also included a picture of a really cute Topiary Tree we found online.


Then one of those "Ah-Ha!" moments hit me ~ I had a vision!

So, to work I went . . . and here is our version of a Candy Topiary:


We started by punching green circles, along with red, pink, & white flowers. Curl all the edges around a pencil (or use your finger tips), then attach them to a styrofoam ball with glue and a stick pin.


Push a dowel rod into the ball and then into whatever container you choose. Make sure your dowel is thick enough to support the weight! (Ours has toppled a couple times already)


We added a little more shimmer to ours by brushing & dabbing on some irredescent glitter glue.
Then we hot-glued Hershey Kisses into the flower centers.


Add a tag with a sweet sentiment and you've got a sweet gift for a special person! We added a little heart to ours which we covered in Crackle Accents to give it a glimmer.


Make sure to create a hand-made card to give along with this Sweet Kisses Tree. This is one from Sandy's Valentine Card Class next weekend. Check it out here on her blog.


This would be a precious project to make along with your kids for their teachers this year. . . altho' they may eat just as many as they glue on!

Thursday, December 18, 2008

Gift Card Holders

Here's a great way to present those boring, ho-hum gift cards that you're planning on giving this year. Make a unique Gift Card Sleeve!


This one is for my mom , whose special indulgence is stopping by her local Starbucks . . . .I bet alot of you can relate to that!


A simple, folded strip of cardstock is all that you need to make a pocket. Then secure a layered, co-ordinating wrap around it. Add a block on top showcasing your theme and make sure to ink the edges.
This is a great opportunity to use those decorative scissors that have been collecting dust!


I used Cricut's "Graphically Speaking" for the mug, steam, & the "Mmmmm"

And then dressed up the Slide-Out Tag with some rhinestones . . .


Here's another one that cutely (is that a word?) keeps a gift card to Blockbuster safe . . .
After all ~ what's a movie without the popcorn?


This time I added some doodly penwork around the edges for a fun feeling and also embossed the "popcorn" & top of the pull-out tag with my QuicKutz embossing die . . .


So give these guys a try . . . They're easy, quick, & inexpensive ~ A great way to use up the scraps you've got sitting around.

And it's so much more fun to give a blah gift card this way. . . .The recipient sure will remember it!

Sunday, December 14, 2008

Buttons, Buttons Everywhere!

We've been seeing them more & more on all kinds of projects lately . . .from cards to pages to home decor' items. It seems as tho' they're back in style again!

Buttons . . .a very simple, everyday item, but what a "WOW" they can make when you add them to your scrapbooks, cards, or hand-made goodies.
You can purchase these treasures just about anywhere, but I, for one (and I'm sure there are many of you out there who have one of these critters), collect mine from 1 of my sons.

He's still at the "I must destroy all of my clothes" stage. So, when I come across something on laundry day that is no longer useable, out comes my good ole' scissors and snip, snip, snip . . . . the buttons (along with pockets from his blue jeans and some clothing labels) come off and into my stash


The wavy, button border on this BoBuuny page just screams "Little Boy"

Buttons will always give your Heritage Pages a time-worn feeling . . .
And here's an inspiration if you're wanting to customize your Christmas Tree Ornaments this year . . .this is a GREAT idea for a Teacher's Gift . . . just pick up a styrofoam ball & some stick pins . . .
Here are a few other ideas that we've found along our scrappin' travels to inspire you to save & use those wonderful, little, everyday creations we know as "Buttons".

Here's another card creation ~ compliments of BoBunny:And an obvious use ~ the centers of flowers . . . only these are layered with some rhinestones, as well:Here's 1 more idea to try . . . .
Those of you stampers out there surely must already have some embossing tools. So why not try stamping & heat embossing these little gems for a spectacular accent!
No matter what you come up with, buttons will add just the right little touch to make your latest project stand out with the "OMG" ~ "That's so cute!" factor. So give them a try . . . You'll be glad you did.

Stop back by The Shoppe's Blog soon for another inspiring idea. . . . .

Thursday, December 4, 2008

We just received an order from Pink Paislee here at The Shoppe so we thought today we'd share a few projects the girls at PP came up with using the Tinsel Town collection:

Here are some cards to start you out . . .

Here's a simple wooden frame just dripping with goodness!

Can't forget to dress up your holiday tree . . .


Oh my! . . . I'm getting dizzy just thinking about all the wonderful pages that can be created with these papers too! . . . anything & everything baby & girlie!

Monday, December 1, 2008

Wine & Dine Idea

OK . . .We're back again with another wonderful idea using your scrapping & stamping stash.
This idea came from BoBunny . . . We loved it so much, we created our own!

This year, when you're giving the Gift of a Bottle of Fine Wine, step it up a bit further! After all, whoever receives this gift will need a set of glasses & coasters to go with it!

We used some fancy rub-ons for ours, but you can also stamp on these using StazOn Ink. The coasters are 4x4 marble or ceramic tiles. Make sure to wipe them down with some rubbing alcohol to remove any dust particles and afterward, give them a coat of clear acrylic spray to seal them! You'll also want to glue some felt squares to the bottoms to avoid table scratches . . . .

Now, don't forget to make matching goblets . . .

And a customized label & tag for your wine bottle . . . .
Stack them & wrap them up with some frilly tulle and you'll have a beautiful, unique gift that the hostess will always remember!
Make a set as a gift or even for yourself, but most of all have fun with this project . . . .TaTa till next time!

Thursday, November 20, 2008

Oh . . .What Fun!

We got the "Oh What Fun" collection in at The Shoppe from 3 Bugs in a Rug. Really, really cute papers & tags . . . .sooooooo many possibilities!

Here's a great idea that the girls from 3Bugs had to share . . . .

Wednesday, November 19, 2008

Candles A-Glow

Today we're gonna share a quick, easy, & inexpensive home decor' project. This would make a wonderful, unique gift as well . . . .
We've put together a beautiful candle setting using plain clear votive candle cups.
For the candle wraps, we've used pieces of white vellum that have been embossed with texture plates & the QuicKutz Tool. You can also use any of the Cuttlebug or Sizzix Embossing Folders, as well. Just remember tho' . . .The smaller your candle cup, the smaller your patterns should be!

After that, we dressed them up with some thin red satin ribbon & floral layers put together with a white eyelet.

For a beautiful presentation, we've placed them on a flat round mirror that we've stamped a flourish on with white StazOn Ink. For an extra added glimmer, add a few clear rhinestones!
This will make a wonderful Hostess Gift for the upcoming holiday parties on your schedule.

Or make one for your child's teacher, the next door neighbor, or your pastor's wife . . .

Don't forget about yourself! Match a set to your bathroom or place it in the front window for a welcoming glow to passersby.

We hope that you find some inspiration in today's project . . . .TaTa till next time!

Friday, November 14, 2008

Before You Know It . . .

the Holiday Season will be upon us. Some of us will be ready and then there will be those of us who are scrambling for last-minute gift ideas.

Well, today's project should help you out a bit with that.

We've decorated some empty clear buckets and filled them with yummy, sweet treats. Make these for favorite teachers(don't forget the room moms!) , the bus driver (they put up with ALOT, you know!), the babysitter (so does she!) . . . anyone on your "Sweet Person" list.


Our buckets came from My Mind's Eye's newest Holiday Collection.


They were filled with these glittered chipboard pieces . . .
One we filled with peppermints & the other we filled with wrapped Hershey Nuggets. They are super-simple to throw together and a GREAT way to use the scraps you can't bear to toss out!

Here are our buckets . . .

We've got plenty more buckets here at The Shoppe along with the "Snowed In" paper kits. They include 1 of each of the papers in the collection as well as a sheet of matching die-cuts.


Here are a couple of pages you can create with this beautiful collection:

We hope you find some inspiration in today's project . . . Stop by The Shoppe to check out these cute buckets in person & the other goodies we've been working on!