Thursday, March 5, 2009

My Latest Project

This is something that I've been toying with as a class project now for several weeks.
An Altered Clock . . .


I needed to give my "Secret Sister" a be-lated birthday gift so I decided to make one for her & see how easy it would be. After all, some of our class participants are still newbies so I didn't want to get into something really in depth. (And Yes~she figured out right away who gave it to her so that's why I can blabb it on here . . .she loved it!)

Of course, pink was my 1st choice of color and I've been having a great time with some of the new BoBunny papers, especially the stripes, so that's what I used for the base on this 1st altered clock:


Then I went on to make one for The Shoppe's wall, too:


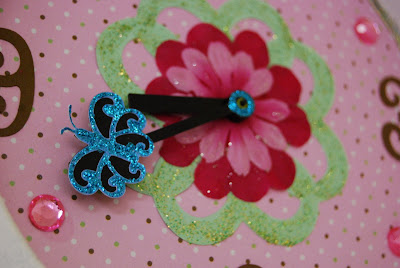
The green swirly pieces on both clocks were cut with the Cricut machine and the StoryBook Cartridge and then dusted with a bit of lime green Stickles.

I wanted to add a butterfly to the second hand that ticks around at all times so it would appear to be flying, but ditzy me snapped it off! So he's just sitting on the hour hand now. . .still just as cute & sparkly!

So now I'm waiting for some new papers to get to The Shoppe and soon you'll be seeing this class on the calendar!

Wednesday, March 4, 2009

The Bathroom Door People


Yep . . .that's what my husband calls the subject of today's post.

You've all seen these guys around . . .on doors, on road signs, painted in parking lots.

They're the simple silhouettes that can add just the right touch to your invitations, cards, & scrapbook pages.

If you've got a wonderful little Cricut machine, then you're in luck! You can cut these easy shapes out from the "Going Places" cartridge in a flash!

And the designers have come up with more than just the man & woman symbols . . . .
they've got families, prego ladies, playful children . . .

even dogs and cats . . .


Here are a couple layouts that I made with this cartridge:
This one is perfect for the little boy who's always on the go . . .

For our "Caboodle" page, I cut out the Man & Woman set three times in 2 different sizes for us and the kids:


And for this last one, I covered the people in clear micro beads for an added dimensional pop!


Now, don't worry if you can't find this cartridge anymore . . . you can rent out ours from The Shoppe ~ or you can always pick up a package of these cuties already cut for you!
Hope you find some inspiration in today's projects . . . some new style to add to your albums.

Sunday, March 1, 2009


Apparently, we must be doing some good stuff on here, cuz we received another blog award!


Thanks go out to Stephanie L. for this one . . . it's fabulous!

Friday, February 27, 2009

Bad Blogger!

Yes . . . that's right. . . bad, bad, bad.

I know it's been W-A-Y too long between posts. Here are my sad, sorry excuses . . .
We've had LOTS of social-ness (is that a real word?) going on here at The Shoppe and it's been soooooooo much fun!

Valentine's Day here hosted 2 new group meetings. We began another CookBook Club with 16 ladies forming 3 different recipe swap groups.

They'll be scrapping their favorite recipes each month to exchange and the best part? They'll be bringing along their dishes for each other to taste-test!

Here's a peek at some pages from a similar group I was in in Kentucky . . . these make cooking so much more fun!


After that, more of us got together and we exchanged names for a Secret Scrappin' Sister Society.

No . . . we're not some creepy cult thing ~ just a bunch of scrap-lovin' girls! There are 18 of us in this group and we remember our sister secretly on brithdays, special occasions, or "just because" with little trinkets of scrapping goodness through-out the year.

We're planning a Secret Sister Tea Party at Christmas when we'll reveal ourselves to each other. So until then, we'll just be showering each other with unexpected gifts like these . . .

All right . . .my gift from "Edible Arrangements" doesn't really qualify as scrappin' but that's OK . . .it involves chocolate and chocolate is ALWAYS good!

OK . . .so if that wasn't enough to all get going, last weekend was our 3rd Annual 20 hour Pajama Crop! OH MY GOSH ! 30 pajama-clad ladies . . . WAY too much fun!

Super fun and crazy games . . .I tell ya, these ladies will do anything for a prize! Poor Amanda F. took a face-dive into the carpet and tore up her knee cuz she was determined to crown the
winner for her team!


Combine all the scrapping & fun stuff with TONS of yummylicious food (might I mention the chocolate fountain at 2am?) and I'm happy to report it was another successful crop!
So now that things are a little less hectic, maybe I can get back to putting some more projects on here. I've got some cute stuff to show you all!
TaTa for now!

Tuesday, February 10, 2009

Quick & Easy


Yep ~ You're seeing that correctly . . .

This Valentine's page is so simple & fast, it has earned the "Easy Button" status!


If you'd like all the details, click here & take the quick tour.
That's it for today . . .Please stop by again!

Friday, February 6, 2009

Happy Birthday!

Happy Birthday to The Scrapbook Shoppe!
We are 3 years old today . . . WooHoo!

We'd like to thank all of our loyal, faithful customers who keep supporting us, especially through these uncertain times.

We know that you all will keep snapping photos of those moments you want to remember, so we'll be here to help you scrap them!
These flowers are from one of our dear customers who remembers our anniversary every year with a bouquet . . . Thank You, Betty!
Sccot over to Amanda's Blog & take a look-see at what she made us!

Thursday, February 5, 2009

Poem to Make You Think!

Today we're gonna share a poem we came across.

This certainly makes me want to kick my butt in gear with my scrapping . . .I don't want this happening to me & my family.

Strangers in the Box

Come look with me inside this drawer,
In this box I've often seen.
At the pictures black & white
Faces proud, still, serene.

I wish I knew the people
These strangers in the box,
Their names & all their memories
Are lost among my socks.

I wonder what their lives were like?
How did they spend their days?
What about their special times?
I'll never know their ways.

If only someone had taken the time,
To tell who, what, or when,
These faces of my heritage
Would come to life again.

Could this become the fate
Of the pictures we take today?
The faces & the memories
Someday be passed away?

Make time to save your pictures,
Seize the opportunity when it knocks.
Or someday you & yours could be
The Stangers in the Box.

For everyone who uses the excuse "I don't have the time" . . . You might want to start MAKING the time!

Commit yourself, even if just for an hour a week . . . Or sign up & join us on Friday nights . . .You'll be glad you did!

Wednesday, February 4, 2009

Sweetie Pie Page

Hello Scrappers!

This post will be short & sweet . . .
Just wanted to share a layout I made yesterday using the new BoBunny "Sweetie Pie" papers that we got in at The Shoppe last week.


If you'd like to see more details, you can view them here.

Thanks for stopping by!


Monday, February 2, 2009

Valentine's Treats

We're back with a few more ideas for presenting sweets to your sweeties this holiday . . .

Now, what would Valentine's Day be without the chocolates?

Yes, you can give the little Conversation Hearts or decorate cupcakes, but chocolate is always best. To give, but especially to receive!

So, today let's dress up those plain chocolate bars . . .

These are a few examples we found while we were blogging out and about:


And here are the ones we've created here at The Shoppe . . .
These are the giant~sized Hershey Bars . . . the ones every scrapper secretly wishes for!


This 1st one was covered in solid cardstock with chocolate & pink paper from Basic Grey's Sultry line. We added a dove chipbird & stamped a tag with some fuzzy fibres.


The next one is made using BoBunny's Sweetie Pie papers, an embossed heart, Prima flowers, and a monogram using Cricut's Storybook Cart, all mounted on a chipboard scallopped circle.

This one would be perfect for a teacher. Or your best friend!


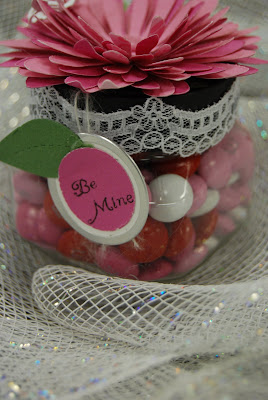
And last, but not least, are good ol' M&M's in an empty flower jar.


We've added lace around the rim and topped it off with layers & layers of die-cut flowers. Add a metal rimmed tag with a cute butterfly from Cricut perched on top!


Super-Simple projects, once again.
We hope that we've inspired you to make this Valentine's Day a little more special.

Thanks for stopping by . . .TaTa till next time

Wednesday, January 28, 2009

Look What We Got!

We had a very sweet message waiting in our In-Box this morning,
so we thought we'd share part of it today.


Thanks Blogger Amy!

Tuesday, January 27, 2009

Goodie Baskets

Hello Everyone!
Today we're going to share an easy-peasy Treat Basket project.
All you really need for this (besides some cute papers) is an oval or circle cutter.


To begin, you'll want to cut 2 ovals or circles from the same or 2 co-ordinating papers. Double-sided works the best so your basket won't have a blah, boring inside. You can leave the edges smooth or use a scallopped scissors for a cuter presentation like we did.


Next, fold your pieces in half:


Then, simply slide them together, forming a point at the bottom. Adhere them together.


After that, attach a paper handle (we punched holes in ours & threaded some ribbon through) and secure it with 2 brads.


Then it's ready for you to jazz up with your favorite embellies & fill with some yummies!


We think this would be a sweet gift for a teacher, surprise a co-worker with one, or hang one on your kid's bedroom doorknobs on Valentine's morning.


Thanks for looking!
TaTa till next time . . . .

Thursday, January 22, 2009

Another Valentine's Project

Yesterday we sent out a newsletter from The Shoppe highlighting some of the newest Valentine's products that arrived.

We also included a picture of a really cute Topiary Tree we found online.


Then one of those "Ah-Ha!" moments hit me ~ I had a vision!

So, to work I went . . . and here is our version of a Candy Topiary:


We started by punching green circles, along with red, pink, & white flowers. Curl all the edges around a pencil (or use your finger tips), then attach them to a styrofoam ball with glue and a stick pin.


Push a dowel rod into the ball and then into whatever container you choose. Make sure your dowel is thick enough to support the weight! (Ours has toppled a couple times already)


We added a little more shimmer to ours by brushing & dabbing on some irredescent glitter glue.
Then we hot-glued Hershey Kisses into the flower centers.


Add a tag with a sweet sentiment and you've got a sweet gift for a special person! We added a little heart to ours which we covered in Crackle Accents to give it a glimmer.


Make sure to create a hand-made card to give along with this Sweet Kisses Tree. This is one from Sandy's Valentine Card Class next weekend. Check it out here on her blog.


This would be a precious project to make along with your kids for their teachers this year. . . altho' they may eat just as many as they glue on!

Thursday, January 15, 2009

Send Your Love . . .

Yep . . .That's right. We're talking about Valentine's Day.
A day filled with red hearts, chocolate, & sweet sentiments.

So to celebrate this holiday, we're going to start sharing some cute ideas for you to create & give to those most special people in your life.

Today's project is a twist on the traditional Valentine's Card . . . Try sending a POSTCARD this year.

Here are the ones that were created at The Shoppe by one of the girls . . .
These are 5x7 postcards cut from chipboard and decorated with papers & stickers.
Once again ~ a great way to use up your scraps!

Add a sweet message and an address . . .Then give the entire card a coat or two of ModPodge to seal it well.Have them hand-cancelled at the Post Office, and think of the smile it will bring to the person who receives this unique surprise in their mailbox.

I sure did when I received this one for Christmas!
Check back often for more quick & easy projects we'll be sharing to help inspire you and your creativity.

Monday, January 5, 2009

A Family Tree

Hello Everyone!

Today we thought we'd share an idea for a Family Tree Project.
This would be precious in a new baby's nursery . . .

Once again, this project is a great way to use up your stash of scraps & create a totally personal and unique piece of artwork.


We used Cricut's Paper Dolls cartridge for our tree base, but you could also free-hand one to fit the size of your frame. These leaves are from an Emagination Punch . . . you can make yours any shape, size, or color combo that you like!

We gave each leaf some inking, a slight crease up the center & added a popdot under one side to give it some dimension.


Then just add your names & any other info that you'd like.

We put birthdays with ours & added a rhinestone to co-ordinate with that month.

The frame we used is an in-expensive one from Walmart that we sanded & painted white. When it dried, we gave it another light sanding for an antiqued, worn look. We also left the glass out of the frame.

Wouldn't this look great in an over-sized frame ~ like 3x5 feet ~ just filled with leaves!?! You'd be able to add photos on the tags to one that size! How cool would THAT be?!?