Thursday, August 20, 2009

Wednesday, August 19, 2009
Yard Sale?

Yes, I'm shamefully crawling back.
No, I didn't fall off the face of the earth. . . .just been super busy with 3 custom album projects and the Disney Class Series I started.
Boy! I didn't know there was such an over-whelming need for Disney designs! The classes have been selling out almost instantly and 6 people have reserved seats for ALL of them!
I think we'll be doing another series like this again . . . and soon!
Anyhow . . . Lately we've been having alot of customers asking when the next Scrapbooking Yard Sale is going to be.
We've been hosting them in February, but only once a year.
With so many requests tho', we're thinking of throwing another bash in October for Fall.
Please go to the poll ( at the top right ) and vote . . . It'll really help us determine whether or not we should wait till the winter months.
Thanks Guys
See ya all soon!
Tuesday, July 7, 2009
Public Television
Hey Everyone!
Just a quickie this time!
Go check Shelley's blog & see what she's up to!
Hint . . . a PBS show!
Shelley's Blog
Just a quickie this time!
Go check Shelley's blog & see what she's up to!
Hint . . . a PBS show!
Shelley's Blog
Friday, July 3, 2009
Make Your Own . . . .
We all love the look that epoxy stickers give to our layouts & cards, but using them all the time can get expensive.


So grab yourself a bottle of this handy-dandy stuff and make your own expensive-looking embellies!
Soon you'll be adding a touch of glaze to glimmer up whatever you're working on . . . .
So today's Shoppe tip might help get you the same great effect while saving you some $ . . .
We'll show you how to make your own!
Here is your secret weapon . . . . It's called "Aleene's Paper Glaze"

You can use this on ready-to-go flat printed stickers to give them some depth & dimension or try it like we did with punched paper pieces to perfectly match your layout.
You can use this on ready-to-go flat printed stickers to give them some depth & dimension or try it like we did with punched paper pieces to perfectly match your layout.
Just squeeze it out onto your chosen item, then let it dry & harden . . .
(drying time depends on how thick you coat your pieces)
On this "Cute as a Button" page, we coated simple circles and then punched holes thru it to resemble matching buttons . . . .
This product is also WONDERFUL to use on beach & pool party themes or on bathtime pages . . . It leaves a "wet" look on water splashes & bubbles!
Or you can use it to just highlight certain features here & there, like we did on this wedding layout . . . 
So grab yourself a bottle of this handy-dandy stuff and make your own expensive-looking embellies!
Soon you'll be adding a touch of glaze to glimmer up whatever you're working on . . . .
Friday, June 26, 2009
Disney Days
Do any of you recognize the guy in this photo?
 Yep . . . Mr. Walt Disney, himself!


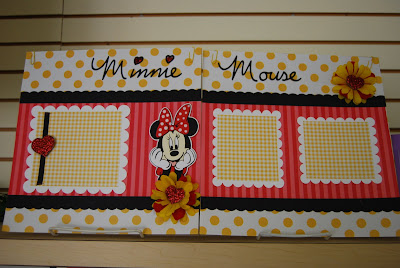
And a couple teasers of the elements . . .

 Minnie's Make-n-Take date is on the calendar for Saturday, August 1st at 1pm.

**HINT** He's the one responsible for "The Happiest Place on Earth!"
 Yep . . . Mr. Walt Disney, himself!
And we know that many, many of you visit his magical amusement park each year, thus taking a gazillion photos of this, that, the other thing and this & that again!
So to help you get those photos scrapped, here at The Shoppe, we're going to start up a "Disney Make-n-Take" series of pages!
These make-n-takes are the perfect way to get your albums finished ~ we do all the thinking & designing for you! All you do is add your pictures!
Here is the 1st set we'll help you create . . . . Pages for the Main Mouse himself . . .
(We're also gonna include a Title Page in this class for you to start your album with!)
Class date is Saturday, July 11th at 1pm

Here is a peeky at one of the design elements on this page . . .

This class has only 4 more remaining seats open so if you're at all interested, PLEASE call to reserve your seat ASAP!
Next up in the series will be pages for Mrs. Mouse (they are married, aren't they?)

And a couple teasers of the elements . . .

 Minnie's Make-n-Take date is on the calendar for Saturday, August 1st at 1pm.
Reservations are already being accepted for her too!
Stay tuned for more of your Disney favorites coming soon!
Until then, remember . . . .
Until then, remember . . . .
Thursday, June 18, 2009
Stumped on Your Story?
I think that maybe at one time or another, all of us have had trouble coming up with some clever or creative journaling to go with our photos.
For me, it's not so much that I get stuck ~ it's more like I don't much like doing the journaling thing. (I know . . . that's pretty bad)
Well, today we're going to suggest a simple, little solution to some of those times when you just don't know what to write about.
We'd like you to all start thinking of some of your favorite songs . . . .
You know ~ maybe a verse or a chorus you always catch yourself humming to or singing along.
One that makes you smile & laugh cuz it's so true in your life ( I can think of a ton of Brad Paisley songs right now!)
Or one that gets you all teary-eyed & makes you boo-hoo every time it comes on the radio. (I'm good at that, too . . . not too smart when you're driving down the road tho')
So here we go . . . .
Here's a couple layouts that I used song lyrics on instead of traditional journaling:

This one is "Kiss Me" by Sixpence None The Richer.
I printed it out on vellum so it would appear soft and the background paper would still show thru.

Next is one of my most favorite set of pages ever!

It's from Toby Keith's "I Wanna Be A Cowboy"

This was my 1st attempt at stamping . . . . ever!


For me, it's not so much that I get stuck ~ it's more like I don't much like doing the journaling thing. (I know . . . that's pretty bad)
Well, today we're going to suggest a simple, little solution to some of those times when you just don't know what to write about.
We'd like you to all start thinking of some of your favorite songs . . . .
You know ~ maybe a verse or a chorus you always catch yourself humming to or singing along.
One that makes you smile & laugh cuz it's so true in your life ( I can think of a ton of Brad Paisley songs right now!)
Or one that gets you all teary-eyed & makes you boo-hoo every time it comes on the radio. (I'm good at that, too . . . not too smart when you're driving down the road tho')
So here we go . . . .
Here's a couple layouts that I used song lyrics on instead of traditional journaling:

This one is "Kiss Me" by Sixpence None The Richer.
I printed it out on vellum so it would appear soft and the background paper would still show thru.

Next is one of my most favorite set of pages ever!

It's from Toby Keith's "I Wanna Be A Cowboy"

This was my 1st attempt at stamping . . . . ever!
So each & every letter was stamped one at a time . . . . . THAT took me awhile, but it was SOOOOO worth it!


And I couldn't resist showing you all a pix of my little cowboy.
This is on our farm in Kentucky . . . He was 4 yrs old & had his very own horse, Dakota.

So now, to send you all off trying to think of your fave songs, we'll give you a couple links to help you along.
If you're like me, I think I know the words, but usually end up WAAAAAY off the path! Or I make up my own words & my kids think I'm such a dork!
(Gosh ~ I shouldn't be telling anyone this stuff . . . you might hear me at The Shoppe one day!)
Well, if that sounds familiar to you, then these places will help you out tremendously with that!
Make this type of layout your personal challenge this week & let's see what you can accomplish!
Let us know how it works out for you!
Wednesday, June 17, 2009

While the GFC (that’s the global finacial crisis!) is still causing doom and gloom all over the world, we, here at The Scrapbook Shoppe, are asking everyone to ‘Keep calm and scrap on’
We know that, thanks to the ease of digital cameras, everyone will continue to keep snapping photos of their favorite people, places, & things.
So why would you stop scrapping them?
Some people say “Oh, it’s so expensive . . . I can't afford that.” But really, is it? . . . think about it.
A sheet of pretty paper costs about 79cents. We could all probably find that in the couch cushions or under the car seat!
You can create some very beautiful pages for $2 or $3 . . . . That’s less than the cost of a fast-food meal or a trip to StarBucks.
Try skipping a trip or two each week to those places (are they REALLY neccessary?) & use that money for your scrapbooks instead. Future generations (not to mention your waistlines!) will thank you!
And by scrapbooking, you will feel a sense of calm-ness during this trying time . . . scrapping is our therapy, our little get-away from our troubles . . . so don’t stop!
Join us for a crop, make some new scrap friends, and save your sanity ~ or if you prefer, come on in by yourself.
The tables are always open during the day! It's a service we, here at The Shoppe, provide for FREE to our customers.
And free is good these days!
Monday, June 8, 2009
Got a Ribbon Dilema?
Before I go on to the ever-important ribbon storage dilema, I would like to sincerely apologize to all of the faithful blog readers out there.
Bad, bad, bad, bad, bad blogger I have been . . .
There should be no excuse for that . . . not really sure what happened.
Oh . . .I know! I was working!
Yep, since starting this blog thing, I've been seriously neglecting lots of store stuff that I should have been doing.
Stuff like more sample pages, more altered ideas, ordering more good stuff!
So I had to get caught up . . . .so, so sorry bloggers!
Anyway . . . we had some very wonderful comments from you guys on our little adventure we call "the blog" and the winner of our very 1st blog give-away is . . . .
Dum . . .Da Da . . . Dum:
Anyway . . . we had some very wonderful comments from you guys on our little adventure we call "the blog" and the winner of our very 1st blog give-away is . . . .
Dum . . .Da Da . . . Dum:
Tracy Jones
She said...
I have only recently found your store and your blog!! I must confess, I spend time at work daily reading your blog instead of working! I have found so many terrific ideas such as the note-taking station made from a double-sided acrylic frame. You ladies have the most impressive ideas and I'm so glad I found you!
She said...
I have only recently found your store and your blog!! I must confess, I spend time at work daily reading your blog instead of working! I have found so many terrific ideas such as the note-taking station made from a double-sided acrylic frame. You ladies have the most impressive ideas and I'm so glad I found you!
So Hip, Hip, Hooray to Tracy!
Email me w/ your addy & I'll send you out a box of scrappin' goodies!
Now . . . . on to the ribbon thing.
We all have been lovin' using ribbon since it's burst onto the scrap scene ~ whether on our pages or on cards. But the big question I get asked all the time at The Shoppe is how to store it.
Does this look familiar to any of you? (don't lie . . . you know it does!)
Tangled in a basket . . .

Or stuffed into a giant baggie . . . .

Well, today we're gonna show you a really cute and practical way to store alot of ribbon in a small space AND neatly. You won't have to search & hunt thru tons of strips for a specific color this way.
And, once again, it won't cost you anything! Nope . . . not one cent!
Now that's MY kind of storage idea!
Here's the secret . . . head on over to your local paint store.
Yes . . .Paint Store
They have tons & tons of paint chip samples and that's what you'll need to grab.
And grab LOTS! All different colors!

Next thing you'll want to do, is get out your circle punch.
You'll want to punch 1/2 circles on either side of each color swatch.
 (Thank You to our hand model, April)
After that, just wrap your ribbon around each color co-ordinating block and that's all there is to it!
Super easy to pull out just the color you're looking for without going thru it all.
No more bulky spools or ribbon stew to deal with.
Plus they look really cute this way, too!

After that just put them into a cute basket . . .

Or . . . (this is my favorite way) . . . get an in-expensive pencil box!
It's the perfect size & will hold a ton of ribbon-filled chips this way.

Hope you all find this to be one more idea we've helped you with.
I promise to be a more faithful blogger from now on.
TaTa till next time
and remember . . .
we love to hear what you think, so drop us a comment when you see something you like!
Monday, May 18, 2009
Goodie Time!
It's time for our 1st Blog Give-Away!


 Just leave a comment on this post . . . Let us know how we're doing, what you like, what you don't . . . . maybe sign up to follow us! & we'll draw a winner on Friday .
But first I'd like to share a couple pictures from Friday's Cupcake Crop!
We had some of the most yummy-licious things ever!
Just imagine . . . . more than 130 cupcakes for us to nibble on all night long!
Next up is our "Sundae on Friday Crop" . . . got any guesses what that might involve?
More yummyness!
OK . . . . So on to our Give-Away.
The Shoppe's blog has been up & running now for 6 months.
As of this posting, we've had almost 7200 visitors!
We've spent alot of time trying to show you all some cute ideas, give you some tips, and maybe bring some oldie but goodie ones back to life again.
We've had alot of positive feedback from customers who've been in.
And knowing that we're helping you with your scrappin' and gift-giving projects, keeps us pushing on . . . wanting to bring you more!
So to say "Thanks for Reading our Ramblings!" we've got some scrappin' goodies to give away to 1 lucky reader!
 Just leave a comment on this post . . . Let us know how we're doing, what you like, what you don't . . . . maybe sign up to follow us! & we'll draw a winner on Friday .
Good Luck Everyone!
And THANX FOR READIN' !
Wednesday, May 13, 2009
Challenge Yourself
Today we'd like you guys to challenge yourselves . . . 


Grab 2 or 3 co-ordinating sheets of patterned paper & see just how many layouts, cards, & altered projects you can make!
I used 3 sheets of these papers from Daisy Bucket to make 6 layouts (plus I have a tad bit left yet for a card!)

Now, of course I added some basic cardstock to each of these and did some Cricutting, Sizzixing, & stickerizing, but I got alot of pages finished.
This technique would be perfect for putting together a themed album quickly.
These pages are all 12x12's so just think how far a couple sheets of paper would go if you were making a smaller sized album!
Here's a closer pix of each of them for you to view (just in case you want to lift any ideas!)
(For some reason the greens photographed in different shades, but all of the pages were made with the same bright, lime green stock)


Hope you all find some of these color-blocking techniques helpful & useful for
your upcoming layouts.
Thanks for visiting . . . Please stop by again soon!
Friday, May 8, 2009
Graduation Pages

First of all, we'd like to share another award we found in our email this morning . . .
Thank You to Amanda W. from somewhere out in blog-land!
She wrote " I love the chalk tip on your blog. I used to use mine so long ago, but mainly for shading. I never would have thought to use them on photos or even printing my pix out on stock! Thank You!"
Well, you are very welcome Amanda W. . . . glad to help!
Now then . . . . on to our Graduation Pages for today.
We're gonna share a really easy layout that can be completed in about 20 minutes.
You don't always need themed papers for you pages.
Sometimes, simpler is better . . . .and more elegant.
We used just black cardstock & some metallic gold paper for this page along with just 1 photo and the invitation.

We cut the info from the inside of the invite and mounted it below the invitation.

Then of course, there's the Senior Portrait with the name cards that always fall out and get lost . . .

And if you have an empty corner, add some something simple to enhance the main items ~ not over-power them.


Then of course, there's the Senior Portrait with the name cards that always fall out and get lost . . .

And if you have an empty corner, add some something simple to enhance the main items ~ not over-power them.
On this page, I laid a plastic stencil down and globbed on a thick layer of glue stick.
Then I covered the glue with gold embossing powder & melted it with my heat gun.
In the center is are some plain white petals with a brad.

It's simple but very nice . . . AND inexpensive!
Didn't spend more than 2 bucks on this one!
So hang onto those invitations and programs & make sure to add them into your memory books. You'll be glad someday that you did!
Thursday, May 7, 2009
Chalk Art
Today we'd like you guys to get another item out from the bottoms of your scrappin' totes and put them back to good use.
We're talking about the pallettes of dry decorating chalks that we all started out with.
They seem to have been replaced by the cat's eye chalks lately. But unlike the cat's eyes, these are MUCH more forgiving.

If you make a mistake with these, all you need to do is erase it with a white eraser and start over again . . . . can't do that with the inky kind!
Now most of us use these for shading & highlighting our die-cuts and photo mattes, but today we're gonna show you how to colorize your photos with them.

And all you need is a very basic supply . . . . cardstock!
You'll want to cut a sheet of cardstock to your desired photo size, choose your photo, & set it to print black & white.

You can choose either smooth or textured.
If you print on the textured kind, your photos will have that canvass-y look to them.

Then all you need to do is start coloring in the areas you want to highlight . . . Easy as that!

Here is my finished page of my daughter's graduation . . .

And a couple close-ups of the added embellies . . . .


Here's another way to use your chalk sets . . .

Then all you need to do is start coloring in the areas you want to highlight . . . Easy as that!

Here is my finished page of my daughter's graduation . . .

And a couple close-ups of the added embellies . . . .


Here's another way to use your chalk sets . . .
Get out your favorite stamps & emboss them.

Then give the images a dusting of chalk . . .

And you've got a really inexpensive, different style of embellishment for your pages & cards.

So go look for those lost, forgotten chalk sets you know you've got around somewhere and try something new on your projects.
Then give the images a dusting of chalk . . .
And you've got a really inexpensive, different style of embellishment for your pages & cards.
So go look for those lost, forgotten chalk sets you know you've got around somewhere and try something new on your projects.
You'll be pleasantly surprised at how it looks!
Subscribe to:
Posts (Atom)