Showing posts with label Altered Projects. Show all posts

Thursday, March 5, 2009

My Latest Project

This is something that I've been toying with as a class project now for several weeks.
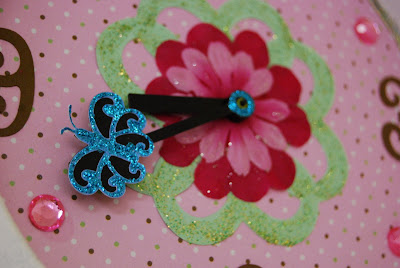
An Altered Clock . . .


I needed to give my "Secret Sister" a be-lated birthday gift so I decided to make one for her & see how easy it would be. After all, some of our class participants are still newbies so I didn't want to get into something really in depth. (And Yes~she figured out right away who gave it to her so that's why I can blabb it on here . . .she loved it!)

Of course, pink was my 1st choice of color and I've been having a great time with some of the new BoBunny papers, especially the stripes, so that's what I used for the base on this 1st altered clock:


Then I went on to make one for The Shoppe's wall, too:


The green swirly pieces on both clocks were cut with the Cricut machine and the StoryBook Cartridge and then dusted with a bit of lime green Stickles.

I wanted to add a butterfly to the second hand that ticks around at all times so it would appear to be flying, but ditzy me snapped it off! So he's just sitting on the hour hand now. . .still just as cute & sparkly!

So now I'm waiting for some new papers to get to The Shoppe and soon you'll be seeing this class on the calendar!

Thursday, December 4, 2008

We just received an order from Pink Paislee here at The Shoppe so we thought today we'd share a few projects the girls at PP came up with using the Tinsel Town collection:

Here are some cards to start you out . . .

Here's a simple wooden frame just dripping with goodness!

Can't forget to dress up your holiday tree . . .


Oh my! . . . I'm getting dizzy just thinking about all the wonderful pages that can be created with these papers too! . . . anything & everything baby & girlie!

Monday, December 1, 2008

Wine & Dine Idea

OK . . .We're back again with another wonderful idea using your scrapping & stamping stash.
This idea came from BoBunny . . . We loved it so much, we created our own!

This year, when you're giving the Gift of a Bottle of Fine Wine, step it up a bit further! After all, whoever receives this gift will need a set of glasses & coasters to go with it!

We used some fancy rub-ons for ours, but you can also stamp on these using StazOn Ink. The coasters are 4x4 marble or ceramic tiles. Make sure to wipe them down with some rubbing alcohol to remove any dust particles and afterward, give them a coat of clear acrylic spray to seal them! You'll also want to glue some felt squares to the bottoms to avoid table scratches . . . .

Now, don't forget to make matching goblets . . .

And a customized label & tag for your wine bottle . . . .
Stack them & wrap them up with some frilly tulle and you'll have a beautiful, unique gift that the hostess will always remember!
Make a set as a gift or even for yourself, but most of all have fun with this project . . . .TaTa till next time!

Thursday, November 20, 2008

Oh . . .What Fun!

We got the "Oh What Fun" collection in at The Shoppe from 3 Bugs in a Rug. Really, really cute papers & tags . . . .sooooooo many possibilities!

Here's a great idea that the girls from 3Bugs had to share . . . .

Wednesday, November 19, 2008

Candles A-Glow

Today we're gonna share a quick, easy, & inexpensive home decor' project. This would make a wonderful, unique gift as well . . . .
We've put together a beautiful candle setting using plain clear votive candle cups.
For the candle wraps, we've used pieces of white vellum that have been embossed with texture plates & the QuicKutz Tool. You can also use any of the Cuttlebug or Sizzix Embossing Folders, as well. Just remember tho' . . .The smaller your candle cup, the smaller your patterns should be!

After that, we dressed them up with some thin red satin ribbon & floral layers put together with a white eyelet.

For a beautiful presentation, we've placed them on a flat round mirror that we've stamped a flourish on with white StazOn Ink. For an extra added glimmer, add a few clear rhinestones!
This will make a wonderful Hostess Gift for the upcoming holiday parties on your schedule.

Or make one for your child's teacher, the next door neighbor, or your pastor's wife . . .

Don't forget about yourself! Match a set to your bathroom or place it in the front window for a welcoming glow to passersby.

We hope that you find some inspiration in today's project . . . .TaTa till next time!

Monday, November 17, 2008

Cookie Swap Idea

Today we're gonna share a Cookie/Candy Swap that's taking place here at The Scrapbook Shoppe.
This idea came from this years edition of "Holidays" from Scrapbook Trends Magazine.

Instead of just a traditional cookie swap, we're taking it a step further & including the recipes(which are stored in a cookie tin) along with all of the yummy treats!
Here's our version:
We've picked up 7"x11" cookie tins & drilled 2 holes at the top. Our recipes are done scrapbook-style on both sides of a 5x9 piece of chipboard and attached with 2-1/2" book rings.

We'll be decorating our covers on Swap Day (along with eating TONS of delicious cookies & candies!) (There goes the diet!!!!)
We're also taking a photo of each participant with our Santa, which we'll print out & have everyone autograph for each tin. That way, we can look back to see everybody in our group.

We've got 10 ladies participating, giving us 2 recipes each! Here are a couple of the recipe cards that will be in our tins . . . We can't wait to see everyone else's!

There's still time to get your special group of friends together for a fun swap like this!
It would be a great opportunity for a Girl Scout Troop to earn their Cooking/Baking Badge or for the Church Ladies Group for their Holiday Get-Together!

Friday, November 14, 2008

Before You Know It . . .

the Holiday Season will be upon us. Some of us will be ready and then there will be those of us who are scrambling for last-minute gift ideas.

Well, today's project should help you out a bit with that.

We've decorated some empty clear buckets and filled them with yummy, sweet treats. Make these for favorite teachers(don't forget the room moms!) , the bus driver (they put up with ALOT, you know!), the babysitter (so does she!) . . . anyone on your "Sweet Person" list.


Our buckets came from My Mind's Eye's newest Holiday Collection.


They were filled with these glittered chipboard pieces . . .
One we filled with peppermints & the other we filled with wrapped Hershey Nuggets. They are super-simple to throw together and a GREAT way to use the scraps you can't bear to toss out!

Here are our buckets . . .

We've got plenty more buckets here at The Shoppe along with the "Snowed In" paper kits. They include 1 of each of the papers in the collection as well as a sheet of matching die-cuts.


Here are a couple of pages you can create with this beautiful collection:

We hope you find some inspiration in today's project . . . Stop by The Shoppe to check out these cute buckets in person & the other goodies we've been working on!

Friday, November 7, 2008

Go Green . . .


We hear this phrase everywhere ~ from everyone and we really should do our part to help keep our world beautiful.
So, instead of just tossing out those empty cans, put them to good use!

Here's a couple storage ideas that we made from some soup cans . . . .Just cover them with some fun papers (make sure you use Glue Dots!) and add ribbon, flowers, buttons, rhinestones, etc.


How about surprising a favorite teacher with this for her desk? You know they ALWAYS need more pencils . . .


~OR~

How about making one to store your make-up brushes in?
You can match it to your bathroom or vanity by using left-over wallpaper!

Have fun with this project idea and BE CREATIVE!